
How to Edit Vlogs Like a Pro Using CapCut Desktop Video Editor
Vlogging has blown up over the last few years. From travel vlogs and lifestyle diaries to everyday and behind-the-scenes vlogs, vlogs allow viewers to engage with creators on a personal, relatable level. While recording a vlog may seem loose, cutting it into a smooth, compelling video is where alchemy takes place.
If you're just starting with vlogging or just need to up your editing game, let's talk about one of the best tools out there right now: CapCut Desktop Video Editor. Initially popular for its phone app, CapCut has now built a feature-packed desktop app that is entirely free, easy to use, and packed with pro-level features. Many creators even combine it with a text to speech tool to add narration more efficiently.
In this tutorial, we will guide you through editing your vlogs, like a pro with CapCut Desktop—everything from trimming video clips and music to transitions, effects, and text overlays that bring your stories to life.
Why Use CapCut for Vlogging
CapCut Desktop Video Editor is a mix of simplicity and functionality. It's perfect for vloggers who want the best result without spending hours mastering complicated software or paying for expensive subscriptions.
That is why creators love it:
- It's free—no watermarks or secret fees.
- Simple, easy-to-use interface that is perfect for novices and professionals alike.
- Includes pro features like keyframes, speed control, chroma key (green screen), auto captions, etc.
- Integrated music, sound effects, and filters for professional effects.
- Chances to export to YouTube, TikTok, Instagram, etc.
Ready to turn raw footage into a binge-watch vlog? Let's do this.
Step 1: Organize Your Footage
The secret to smooth editing is having your clips organized. Launch CapCut and organize your videos, images, audio, and voiceovers into folders in advance. Arrange them by day, scene, or topic—whatever keeps it organized.
Then open CapCut Desktop, create a new project, and load your content. You can drop it all on the timeline, or use the media panel, so it is all readily available.
Choose your aspect ratio
16:9 for YouTube and standard vlogs
9:16 If you're creating vertical vlogs for Reels or TikTok

Step 2: Cut Out the Boring Stuff
This is where your vlog begins to form.
Trim the fat: Cut out excessive pauses, uncomfortable silences, or anything that does not add.
Split your clips: Divide your clips into bite-sized chunks using the Split tool (Ctrl + B).
Reorder scenes: Rearrange the scenes to have a natural flow or a more established storyline.
Step 3: Add Music and Sound Design
Good vlogs aren't just visual stuff—also, they also sound good.
CapCut makes it extremely easy to add audio. Tap the Audio tab, and you'll get a list of royalty-free music and sound effects. You can add your own music too, if you've got something in your mind.
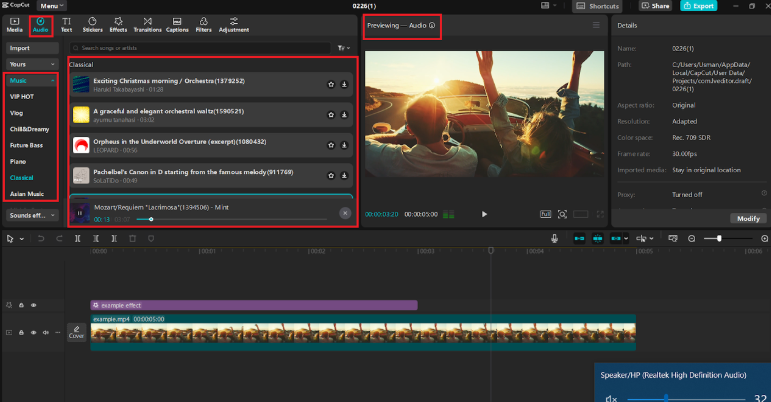
This is how a professional uses sound:
- Select music that suits the mood (relaxing rhythms for a soothing day, upbeat tunes for vlog traveling).
- Turn it down so it won't overpower your voice.
- Employ effects such as "camera click," "whoosh," or "ding" to produce additional transitions or more dramatic instances of emphasis.
- You can fade into and out of music, along with splitting soundtracks apart in order to designate where they start and stop.
Many vloggers also use an AI video generator to pre-plan or produce animated cut-ins to enhance their videos.
Step 4: Add Voiceovers or Dialogue Segments
Regardless of whether you are narrating, commenting, or just talking to your audience, voiceovers can be seamlessly added through CapCut.
Go to Audio > Voiceover and record in-app. All you need is a decent mic (even your internal laptop mic will suffice in a pinch). If you've already got some audio recorded elsewhere, just import it and drop it onto the timeline.

Ensure that your tone is concise and consistent with the pictures. If you must,
- Apply noise reduction for purer sound.
- Don't utter "ums," "uhs," or pause for extended periods to make it shorter.
- Add auto-captions for greater accessibility (and engagement!).
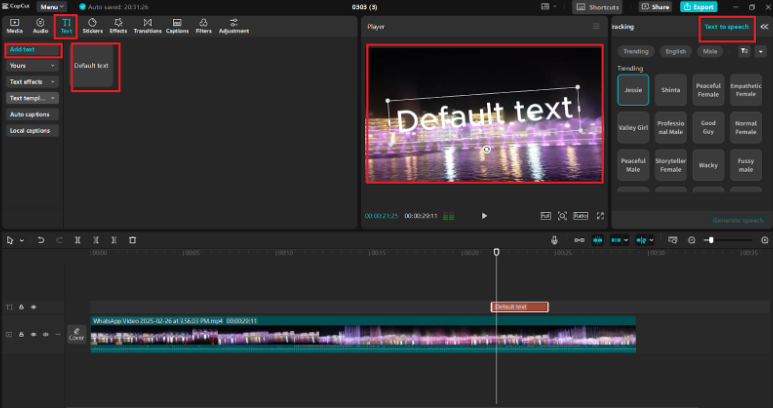
Step 5: Add Context with Text and Subtitles
Few words can speak a thousand. It's simple with CapCut to add:
Titles and introductions: Start with a good, dynamic title to arouse interest.
Captions: Automatically generated using the Auto-Caption feature (a real time-saver).
On-screen labels: Use formatted text to label places, people, or significant events.
Change to the Text tab, choose pre-determined text styles, and make changes to fonts, color, animations, and timing.
Some creators enhance segments further with a voice changer effect—ideal for comedic vlogs or skits where you want to emphasize different moods or characters.
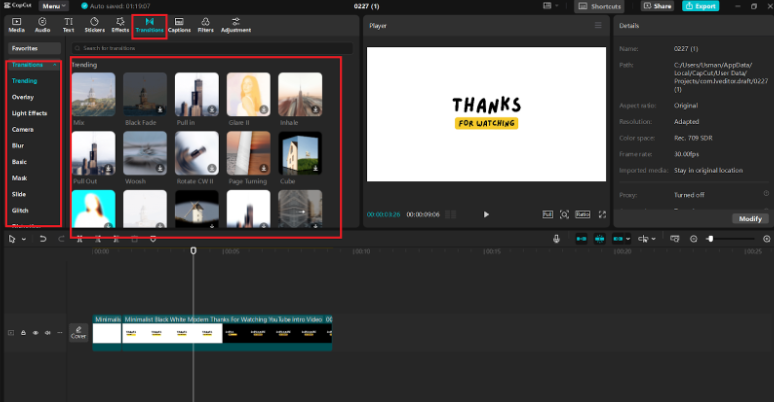
Step 6: Insert Transitions and Effects for Polish
This is where your vlog transitions from "just okay" to wow.
Transitions: There are dozens of CapCut's transitions, fade, zoom, spin, slide, etc. Use them in between clips to enable smoother transitions.
Video effects: Put some pizzazz with filters, VHS overlay, light leak, or shake effects. Simply visit the Effects panel and play around.
Keyframes: Need to zoom in on a moment or pan over a still photo? Use keyframes to add motion and capture attention.
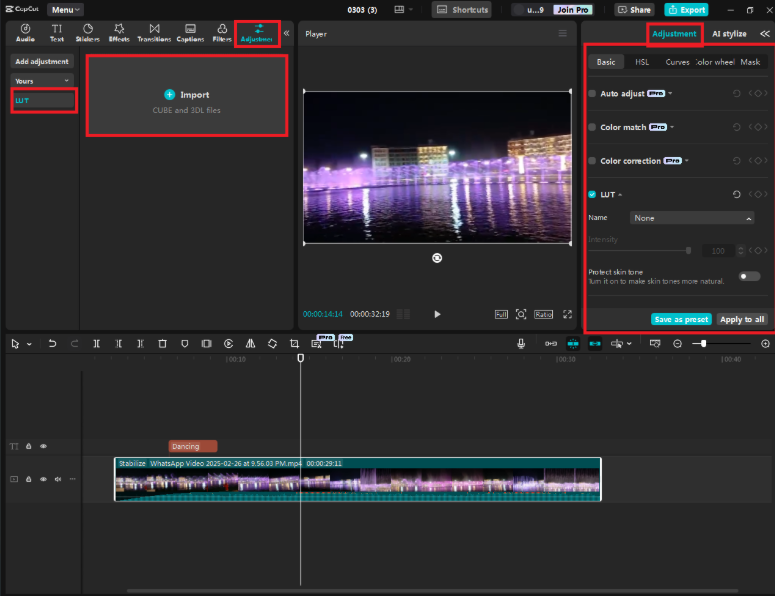
Step 7: Color Grading and Filters
Color can determine the mood of your vlog. CapCut has both filters and manual control in the Adjust tab, where you can adjust:
- Luminance
- Difference
- Saturation
- Temperature
- Highlights and shadows
You might employ a cinematic aesthetic, sunset warmth, or simply even out the unbalanced lighting
Step 8: Call to Action(CTA)
Finish your vlog with a good outro:
- Thank your audience for watching.
- Ask them to subscribe, comment, and like.
- Tease your next video or mention a playlist.
- Finish it off with animated text, a fade-out effect, or your own end screen.
CapCut also enables you to save an outro template, so that you can reuse it in every vlog—consistency is the key to branding.
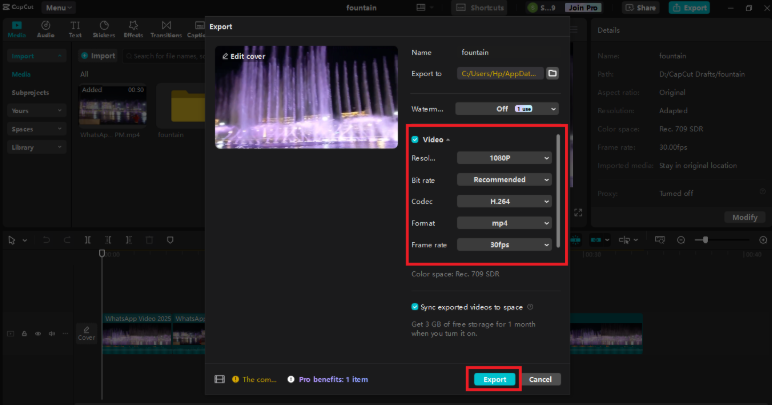
Step 9: Export and Upload
After your vlog has been edited and is ready for viewing:
- Press Export.
- Adjust to a resolution (1080p is ideal for YouTube).
- Adjust settings like bitrate or frame rate if required. Name your file, select a save location, and export. CapCut produces your video instantly, and you can upload it to YouTube, Instagram, TikTok—where your audience lives.
Final Thoughts
Editing vlogs doesn't have to be tedious or time-consuming. With CapCut Desktop Video Editor, you can use all the tools you need to transform raw footage into a refined, compelling narrative, without having to be a tech genius or spending a fortune. Whether you're documenting your everyday life, travel experiences, or creative skits, CapCut provides you with the creative liberty to make your vlogs shine.


